Installation
The hwrt toolkit can be installed via pip:
# pip install hwrt
However, you might have to install some packages first for scipy.
Debian-based systems
Debian-based systems are Ubuntu, Linux Mint, and of course Debian. If you have such a Linux system, then the following commands will help you to install the hwrt package.
For scipy, numpy and matplotlib you might need these packages:
# apt-get install python-pip libblas-dev liblapack-dev gfortran
# apt-get install python-scipy python-numpy
# apt-get install libfreetype6-dev
# apt-get install libgeos-dev
If you want to use MySQL functionality, you will need
# apt-get install libmysqlclient-dev
If you want to use bitmap features, you have to install pillow. This might include installing the following:
# apt-get install python-dev python-setuptools
# apt-get install python3-dev python3-setuptools
# apt-get install libtiff4-dev libjpeg8-dev zlib1g-dev libfreetype6-dev liblcms1-dev libwebp-dev
Python packages
# pip install pymysql
Now you can install the remaining packages:
# pip install PILLOW
# pip install natsort matplotlib coveralls
# pip install numpy
# pip install scipy
Now you can install pfile_utils. Some explanation of what they are can be found at my blog
As a last step, you can install hwrt:
# pip install hwrt
Test installation
You can check if it worked by
$ hwrt --version
hwrt 0.1.190
Please send me an email (info@martin-thoma.de) if that didn’t work.
First steps as a developer
First of all, you should download the raw data. This is done by executing download.py.
Next, you can view a simple example by view.py. For example, with view.py --list you can view all raw data IDs of your current data. With view.py -i 291075 you can see how the preprocessing steps and the later data multiplication steps influence the recording. If you didn’t execute view from a model folder and if you didn’t specify another model with -m, you will get the output of the small baseline model that was created in your projects root folder (~/hwr-experiments per default, but you can modify that with ~/.hwrtrc). That will show 3 rotated images of \(\pi\).
If you want to see more examples, have a look at https://github.com/MartinThoma/hwr-experiments
First steps as a user
The command
$ hwrt record
will open a window. You can draw a symbol there:
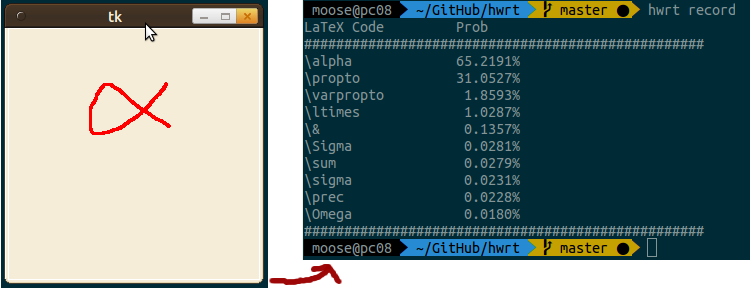
Close the window when you’re ready. The classification result will be shown in the terminal.
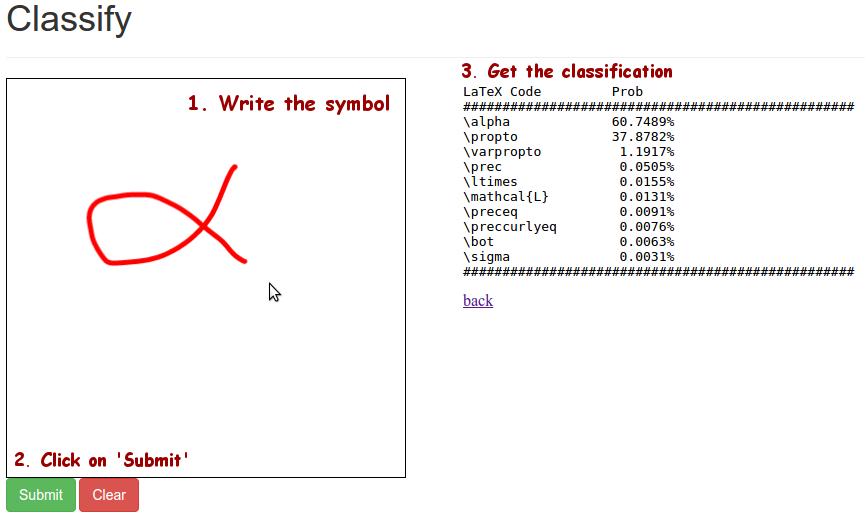
Alternatively, you can start
$ hwrt serve
and go to http://127.0.0.1:5000/interactive to see
nntoolkit
In order to use hwrt completely (especially testing, training and record.py) you have to have an executable nntoolkit that supports the following usages:
$ nntoolkit run --batch-size 1 -f%0.4f <test_file> < <model>
has to output the evaluation result in standard output as a list of floats separated by newlines \n+. The evaluation result might either be the index of the neuron with highest activation or the list of probabilities of each class separated by spaces.
$ nntoolkit make mlp <topology>
has to print the model in standard output.
The hwrt toolset is independent of the way the training command is formatted as the training command gets inserted directly into the configuration file info.yml of the model.
In order to implement such a neural network executable one can use Theano, cuDNN or Caffe. Deeplearning contains example code for multilayer perceptrons written with Theano (Python).